Note: These were compiled prior to me attaining IFBB Pro Status
Tag fitness
No Equipment Workout Video Superset 5 – Another Leg Blast
Note: These were compiled prior to me attaining IFBB Pro Status
Booty Blasting Routine Superset #3 Video For SWAT Fuel
Note: These were compiled prior to me attaining IFBB Pro Status
Fitness California Style TV Pilot
http://www.smhollywood.com/#/fitness/4577129820
 I am pleased and honored to be one of the cast members in this fantastic TV pilot!
2013 NPC TEAM UNIVERSE INTERVIEW WITH BIKINI COMPETITOR STACEY NAITO!
NPC EXCLUSIVE!!! Women’s Prejudging Competitor Videos 1 of 3
I Am A New IFBB Bikini Pro!
I was at the NPC Team Universe in Teaneck, NJ last weekend, where I had the following placings:
First Place Masters 35+ Bikini Class B
First Place Masters 40+ Bikini Class B
Overall Title Masters 40+ Bikini
Fourth Place Open Bikini Class D
IFBB Professional Status

Abs Are Made In The Kitchen, Not The Gym
 People ask me all the time how they can get their abs to look as defined as mine, assuming that I will give them an abdominal exercise regimen which will deliver guaranteed abs of steel. Instead, I tell them that what they eat is the key to whether their midsections look like washboards or more like barrels. While it is true that some abdominal muscle development is necessary for that chiseled look, I will never advocate ridiculous amounts of abdominal crunches, especially for the average person, nor will I overlook the importance of diet.
I admit that I am a bit of a genetic freak in the abdominal department, and have even forgone training my abs for many months at a time in an effort to get those crosscuts to flatten out a bit. It is also a rare thing for me to blast my abs with an extensive routine. But I also know that if I eat a lot of bad foods over the span of several days, my abs will go into hiding and all those deep cross cuts will disappear. So when I say that diet is key, and that abs are made in the kitchen, I know first hand that this is the truth.
What are the foods one must avoid in order to maintain good abdominal definition? Here is a list of some of the worst offenders:
SUGAR and all sugary foods
Saturated fat in general
Cheese
Processed meats
Any foods with a high salt content
Breads and wraps made with white enriched flour
Alcohol
I can guarantee that if you are eating these foods regularly, you will never see chiseled abs pop to the surface, no matter how many abdominal crunches you do. If you stick to clean foods, you will have a much better chance of coaxing that abdominal definition to come out. Stick to lean meats, fresh vegetables, whole grains, healthy fats such as olive oil and avocado, and make sure to drink plenty of water.
Stuck in A Workout Rut? Try Pyramid Training
If you have hit a training plateau or are just bored with your current training regimen, you might want to mix it up by incorporating pyramid training into your routine. Pyramid training is an extremely effective way of increasing strength and muscle mass and is easy to incorporate. There are different types of pyramid training designs which exist, but the ascending type is the best for individuals who are relatively new to weight training, as it provides a warm-up for the body before the weight used increases.
Types of Pyramid Training:
ASCENDING: You will start out with a light weight and perform 12 to 20 repetitions in the first set, then increase the weight used while decreasing the number of repetitions in subsequent sets.
1st set – 15 to 20 repetitions with a light weight
2nd set – 12 to 15 repetitions with a light to moderate weight
3rd set – 10 to 12 repetitions with a moderate weight
4th set – 8 to 10 repetitions with a moderate to heavy weight
5th set – 6 to 8 repetitions with a heavy weight
DESCENDING: You will start out with a heavy weight and perform 6 to 8 repetitions in the first set, then decrease the weight used while increasing the number of repetitions in subsequent sets.
1st set – 6 to 8 repetitions with a heavy weight
2nd set – 8 to 10 repetitions with a moderate to heavy weight
3rd set – 10 to 12 repetitions with a moderate weight
4th set – 12 to 15 repetitions with a light to moderate weight
5th set – 15 to 20 repetitions with a light weight
DOUBLE PYRAMID: You will start out with a heavy weight and perform 12 to 20 repetitions in the first set, then increase the weight used while decreasing the number of repetitions in subsequent sets. On your fifth set, you will decrease the weight used while increasing the rep range. When you are on the descending portion of this pyramid, you will not be able to perform as many repetitions due to the muscle fibers being closer to failure.
1st set – 15 to 20 repetitions with a light weight
2nd set – 12 to 15 repetitions with a light to moderate weight
3rd set – 10 to 12 repetitions with a moderate weight
4th set – 8 to 10 repetitions with a moderate to heavy weight
5th set – 10 to 12 repetitions with a moderate weight
6th set – 12 repetitions with a light to moderate weight
7th set – 15 repetitions with a light weight
Foam Rollers
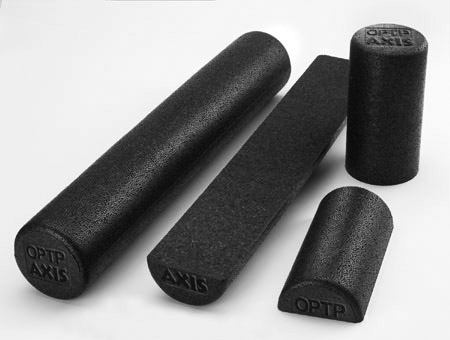 If you have not used a foam roller to massage tight muscles before, you might want to explore their ability to release muscle tension. When you use a foam roller, your body weight provides the pressure which releases tension in tight muscles on the back, legs and other body regions. These clever rollers can also be used during exercise to increase balance. There is a wide selection of firmness, size, and shape available in foam rollers today, each designed for different tasks or body regions.
If you are primarily interested in using a foam roller for releasing tension knots in your muscles, you probably should opt for a greater degree of firmness. Foam rollers are usually color coded according to firmness, with the following designations:
WHITE – The softest
BLUE or GREEN – Moderate density
BLACK – The firmest
If you are truly new to foam rolling, you might want to start with a white one, then switch up to a greater degree of firmness later. However, if you are like me and need a good amount of pressure to release muscle tension, the other colors will confer greater firmness and also will be more sturdy and durable. You should also select a firmer roller if you plan to use it often, and if you plan to lie on it frequently during exercise.
As for shape, you may choose a half-dome roller so that the roller will not roll out from under you, or you may choose a full-dome roller if you really want to manipulate tense tissues by rolling on it while using the weight of your body. If you plan to take a roller with you to the gym, pilates or yoga classes, you can purchase a roller which is shorter in length, perhaps 12 or 24 inches as opposed to the full 36 inch length which is most commonly seen.
